

Ingredients:
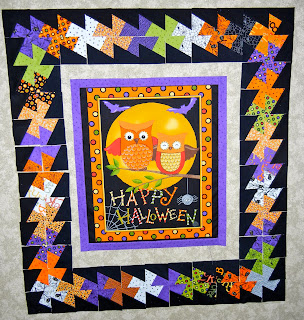
1 Happy H"owl"-o-ween Charm pack
1 Happy H"owl"-o-ween Panel
1/2 purple stars from Happy H"owl"-o-ween line(19956-17) for inner border and binding
3/4 yard Bella 99 (black)
1 yard backing
1-Lil' Twister Tool by CS Designs

Basic Sewing supplies / all seam allowances 1/4"
Start by picking one side of the panel to feature in your wallhanging and cut it to measure:
17.5"x 22.5"centering design

Next cut 3 strips of the purple stars 1.5"x WOF. Cut one in half so you have four pieces as shown to go around your panel:
Sew them in place top and bottom first then the sides:

Your panel should now measure 21.5"x24.5"
Constructing the Twister Frame:
First arrange your charm pack 10 across the top and bottom and 11 down the sides - distributing the colors however you prefer, here is my arrangement:

(you will use all but four squares from the charm pack)
Next you will sew together squares across the top and bottom BUT do not sew four the corner squares!
Start with the second square on the top and sew them each to their neighboring square over to the last one, which is the corner. Repeat with the bottom (again leave the corners for now)
Here is what I ended up with:

Now cut 2 strips of black fabric to measure 5"x 36".
Sew these as shown- one under the top row and one on top of the bottom row you just created.

Now starting in the upper left corner sew that corner square to the square just beneath it and repeat this for the upper right corner:

Take the bottom left corner and sew it to the square just above it, repeat for the lower right corner

Next sew these units to their corresponding ends as shown completing your top and bottom rows.

Sew your side columns of squares:sewing each square to their neighboring square creating two strips with 7 squares each.
Next cut 2 strips of black fabric measuring 5"x 31.5". Sew one black strip to the right side of the left column and sew the second one to the left side of the right column. ( note the black frame we are creating within the squares)

Sew the side columns to the top strip and the bottom strip as shown to complete the inner frame:

Cut six strips of black fabric 3" x WOF. Sub cut two in half and apply one of them to each of the remaining 4 whole strips.
Measure and cute two strips to be 3"x 49" and
two strips to be 3"x 49.75".
Sew to the 49" strips to the top and bottom:

And sew the 49.75" strips to each side:

Note the frame is currently way to big for the panel but we are ready to do the Twist!
 Align the Lil' Twister lines to the lines of fabric intersecting on your quilt as show above. Using your rotary cutter, carefully cut around the shape leaving this:
 Move down the strip continuing to cut squares down the line at each intersection:
 Here are the missing squares from above forming our twisted border:
 Keep your new "Twisted" squares in order placing them around the panel as shown. Once you get to the end go back and do the next row.

 Cut the Twisted sqaures down each side as well.
 Until you complete the frame.
 Begin sewing the twisted squares top and bottom as shown- skip the first two squares as they will be part of the sides. Sew the seven center pairs as shown upper to lower then side to side:
 Now you can see the Twister border fits perfectly above and below your panel!

 Then sew together the sides squares and sew add them to the panel!
 All done!


Sew the top and bottom onto the panel:


Adorable! ... and wonderful tutorial!
ReplyDeleteThat's sew cute!
ReplyDeleteThats very cool! I got lost at one point but went back and read the steps again and I totally got it! Thank you! I cannot wait to give this a whirl.
ReplyDeleteThis is absolutely adorable, and the tutorial is very easy to follow.
ReplyDeleteGreat tutorial and easy to follow. Is there an easy way to calculate the border if I wanted to use it on a different size quilt? Thanks for sharing.
ReplyDeleteGee-Gee, The Lil' Twister tool finishes at 3" so all the sides have to be in an increment of 3" but you also need two of these widths (6" )to make a finished twister. So the top and bottom of this wallhanging are 21"( which is of course divisible by 3) but I didn't need it divisible by 6 because I knew the sides were being added and they were 24" (divisible by 6) and they would complete the half finished twisters on the top and bottom corners.
ReplyDeleteI hope that was understandable and not just clear as mud! Great question! I hope you are able to adapt this to your own projects!