Friday, January 28, 2011

Fiber Art Book pages

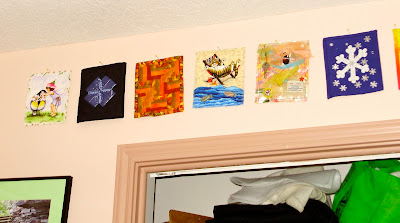
The postcard pizzazz exchange group I belonged to proposed doing a year long exchange of fiber art book pages.  They were to be 5.5"x 6.5" in size and the themes and partners for the exchange would be different every month but in the end we'd all have 12 pages to ring together. Mixed media was encouraged. I chose not to bind or ring mine. I have them displayed in my sewing room:


Here are my pages that were sent to various other participants so I no longer have them:


Theme: Open--you had to make your own choice for the first one- I drew the chameleon (who has to make this choice regularly!) and then hand embroidered him on white fabric. Inked the word "...choices..." in and put various prairie points around him before binding.
 Theme: Secret Garden:
 I felted wool roving and then embellished it with beads and embroidery then layered all of that under the "stone wall" made of felt pieces and made a door that opens on a felt hinge.
 Theme: Black and White and one other color: I used the video tutorial that Diane Gilliand ( of craftypod.com) did on folded fabric flowers, Kanzashi, embellished with buttons, thread painting and bedazzles.
Theme: Recycyling/Found Objects: I used a piece of a produce bag to weave various ribbons and trims in, a flattened bottle cap and I bound it with strips of screening.
Theme: Flowers/Spring. I am in Texas so Bluebonnets are big here in the spring. I used a printed picture of a bluebonnet, a torn piece of a gingham printed paper bag, vellum, yarn and metallic threads, fused hand dyed fabrics and tulle.
Theme: Scenic, I made a layered mountain scene using, tulle, fabrics, angelina, quilting and fusible applique
There were more..... but I didn't always take a picture. Shame on me.... It was very fun to have a new theme every month and to have to produce something every month- like the round robin this commitment forced me to do something creative every month in this case it was small but it could still be time consuming depending on how complicated I decided to make it. It was really good for me artistically to participate in this, I tried all kinds of new techniques and really enjoyed the playtime it gave me.

Thursday, January 27, 2011

Quilting Improv Workshop

Another speaker I booked for our guild, Mary Ann Littlejohn also gave us a workshop.  This one was called Quilting Improv using scraps which on the outset does not sound very interesting but she is an art quilter and so she really came at it in a whole different way.
She had you take a selection your of strips and sew them together without a measuring and cutting and all of that. The you would start assembling layers around a little focal block or focal fabric to make your little art piece. You could use the strip set to cut different sizes to go around it or you could take squares and sew them diagonally to make irregular half square triangles etc...
My class product was not to my satisfaction. I really wanted to use this print:
Which my grandmother had given to me from a Southeast Asian trip she had taken.
Unfortunately I brought fabrics to the workshop that were too matchy to that. Not enough sizzle or contrast for the look I wanted. I had selected a lot of pinks to match the focal fabric and I don't really like pink so what I was thinking is a mystery...  I guess I was used to picking fabric for a traditional quilt -- so that everything matches, I had to get out of my box. Here is what I ended up with in class, not my cup of tea.
When I got home I immediately started another quilt because I loved the technique, was really jazzed to try it again and had learned a lot from the workshop. Here is the product, which I love. 
It measures:11.5"x 12"

It was fun to use these as little machine quilting experiments- I quilted each little area differently. I added the bead fringe on one part and buttons of course!
I made another one later in that same week! This one reminds me of a crayon box because of that school bus yellow binding and rick rack (and the rainbow of colors within). 
 It measures 11"x12"

A week later my husband woke up to go to work at 5:30 as usual but I was not in bed. I had woken up at 3:30 and when he woke up I was nearly through making this:
 details of quilting:
 
I had a brainstorm in the night about using my hand dyed fabrics and batiks so I just followed my muse despite the hour. This one I constructed more as a row quilt-- deviating from the original technique which started with a square of focal point in the piece.


My friend Diane bravely took the class even though she was very uncomfortable with the lack of pattern and rules.  We were asked not to use ruler with our rotary cutters and she looked like a deer in the headlights. She made it through though with a beautiful little quilt you can see hers on her blog here.

Wednesday, January 26, 2011

Postcard Inspiration

After the guild's workshop, quilted postcards kind of took off for our guild. My friend Susi formed a bee called "Made to Bee Cancelled" to work on them once a month.  I made a lot of postcards, they are quick and fun. I also found a few yahoo groups online that did swaps. A nice group for beginners was postcardpizzazz@yahoogroups.com-- there are other groups but, some of them actually had "standard" systems where if someone complained about your postcard you could get kicked out. That was a little intimidating so I stuck with postcardpizzazz and while some postcards I received were not exceptional the people were nice and I got a wide variety of ideas and inspiration. They also did other exchanges like Dotee dolls and Fiber book pages ( but that is another entry)
Another place I got a lot of ideas from was my children's book collection.  I had a bunch of wooden dinosaur buttons that my mother had bought for me to make something with for my son but they never made it into a project or garment for him as a baby and at age 9 he wasn't so into dinosaurs anymore but I got an idea.


Dinosaurs, Dinosaurs
My son had received this book Byron Barton as a baby. It was all simple shapes and bright colors and still lingering on our bookshelves, it was almost like a pattern to follow! Perfect inspiration. I took some artistic license and made these postcards which are some of my favorites. 
 (Yo-yo's, decorative stitches, buttons and metallic fabrics)
 (Buttons, decorative stitches, beads, metallic fabric, hand embroidery)
 (Beading, metallic fabric, buttons, couched yarn on the edges)
(metallic rick rack, yo-yo's beads, buttons, decorative stitches)
See Mom, I used those dinosaur buttons finally!
Postcards like trading cards are little works of art. Frame them, decorate your walls, send them to special friends, collect them.  Make them for holidays, swap them with a group. Lots of possibilities lots of fun.

Tuesday, January 25, 2011

Quilted Postcards

In 2009, I booked Nancy Dickey to speak about designing a winning quilt at our local guild. While talking with her about the lecture, she mentioned that she liked to teach a quilted postcard workshop for guilds and asked if we were interested.  I had heard of these before and since I had enjoyed making trading cards so much I decided to give it a try too.
She had little kits for us and several step outs and examples. We were making a layered raw edge applique flower.  We got to play with Angelina fibers, fusible, decorative stitches and tulle.
Angelina fibers, for those who don't know, look like cotton candy fluff.  It comes in all different colors, in little bags like these:
 It comes in different "cuts", this is the finest
- it is like baby fine hair:
Lay it out thin and a build it up to the thickness you want.  
*Thin will be see through but shimmery and shiny*
*Thick layers will show the color of the Angelina more and add shine and shimmer without being able to see through it* 


When laying out your Angelina fibers lay them on one side of a Teflon sheet and then fold the other half of the sheet over and run a hot iron over it.  All the fluffy fibers collapse and melt together where ever the iron ran over them.  Once it cools the fibers peel right off in one flat piece. The Angelina gave a nice shimmer in the postcards and I was additionally excited because I had found this stuff a couple years ago, bought a bunch and then never used it! It had a purpose now! 
The tulle was interesting on the post cards, it made whatever was behind it seem a bit farther away so suddenly our pieces had depth and appeared more three dimensional.
After the first card we were encouraged to try some designs of our own.

I had bought this Elvis Presley fabric a few months before planning to make something for my mother in law who was a fan. I found some of my hand dyed fabric and some batiks that looked pretty good with it. Off I went. It was like this fabric was made to be embellished it was really fun once I got started.
Quilters Crossing is doing a Valentine postcard swap. No purchase necessary to participate. Just drop off a quilted postcard by February 9th. This is my entry:
You will receive one $5 coupon on your next purchase for participating and you'll get a postcard in the mail from one of the other people participating! Win, win!

Sunday, January 23, 2011

Trading Cards

So my good friend (and often times partner in quilting crime) and I made a few trading cards and proudly toted them to the International Quilt show to find the Quilting Arts Trading Card wall after reading about trading cards in their magazine a few years ago. 
2.5"x3.5" little pieces of art!
We went to make our exchanges. 
Some cards were really interesting. I was particularly drawn to the mixed media cards.  We found and traded for cards from Australia and all over the US.  I even ended up with a card made by Miss Quilting Arts herself-- Pokey Bolton! I grabbed it thinking my son who had watched me make my cards all week would like it. I was happily surprised to see it was made by a "celebrity".  He just liked that it had a spider stitched on it!
We didn't swap all our cards at once. We would "shop" the wall frequently only leaving one of our cards when we found another one we liked enough to trade for. But it was so flattering when we'd come back to the wall and the cards we had left were taken!
I know we sound like trading card snobs but it is easy to get attached and you don't want to just give them away! 
One year the theme was Holidays here are some of mine:
St. Patrick's Day:  Fabric, Vellum, stamping, decorative stitches, sequins, button and paper.

 Valentine's Day: Felted Wool Roving then hand stitched and beaded
Another year the recommended theme was "Entertainment". Anything that entertained you- books, movies, TV, characters, famous lines, etc... I had just read all the Twilight books by Stephenie Meyer and I themed my cards around characters in that series. They were all red white and black like the book covers and all the vampire cards had a drop of blood made out of bedazzle gems.


I later made these themed around Charlaine Harris' Southern Vampire Series:

I showed the back so you could see what many people put on the back: name, if it is one of a series, inspiration, maker, date, email and location.
Trading cards can be made by someone of any skill level. My children have made them:
Angelina, fabric, beads, plastic scrapbooking snowflakes and bedazzle gems
as well as some very accomplished quilter friends I know. My mom made this one: For the hummingbird mom used a stencil, paintsticks and a bedazzled eye.

 
 Trading Cards take very little materials, thus can be cheap and often made of scraps leftover from other things.  They are fun to embellish and try new techniques on at a very small almost waste free scale. I have mine on a cork board posted in my sewing room mixed with those I have traded for. Here are some others I have played with:
Wool Roving, beading and hand embroidery:
Buttons, hand dyed fabrics cut with a zig zag rotary cutter:
My kids come in from time to time and ask me to get one down to look at or ask me where I got one etc... I highly recommend trying your hand at it. They are collectible but also have some useful options. My clever friend made one and embellished a plain journal cover with it.  
I made this one out of selvages and buttons:
I have seen them used as labels on gifts, framable art pieces or as gifts of course. Search Etsy or Ebay for ATC (artist trading cards) people make original oil paintings on these and sell them on these sites! I bought my mother some done with thread play.  So many creative options.... so little time.

Friday, January 21, 2011

On my machine right now...

 My friend Charmaine made this wallhanging out of my other friend Reeze's pattern. Reeze has a blog and a pattern company. You might have also seen this pattern featured in a magazine recently!
 It was a fun pattern to quilt.

 I really like the way it looked once the background was all pushed back. 
 Of course I ran out of bobbin thread 3 little loops from the end of the round....
It is almost uncanny how often this has been happening lately but... I have been doing an awful lot of quilting lately and that has been great!
I am really happy with how this came out. Check out the back: